Like many other people, my day-to-day work revolves around working in Excel. Over the past years, I have noticed a trend in specific actions that are repetitive and involve some additional steps. Some of them are simple as copying an entire array of data into a new spreadsheet or unhiding columns. Others are annoying inconveniences, such as changing multiple value fields from Count to Sum in a Pivot Table. The bottom line is that I was tired of the extra steps and clicking around so, I decided to add some custom tools to handle them.
How does it work?
The idea is that we can replicate the actions by using a VBA or macros. Oversimplifying; first, we write the code, save it on a personal macro book, add it to the Ribbon and enjoy! Next, I will share my favorite tools, what they do, how to set them up, and how to add them to your Rxibbon for easy access. But before we start, we must have the personal macro workbook enabled. If you already know how to do it, skip this part and check the last section; Custom Excel Tools.
Enabling developer mode and personal macro workbook
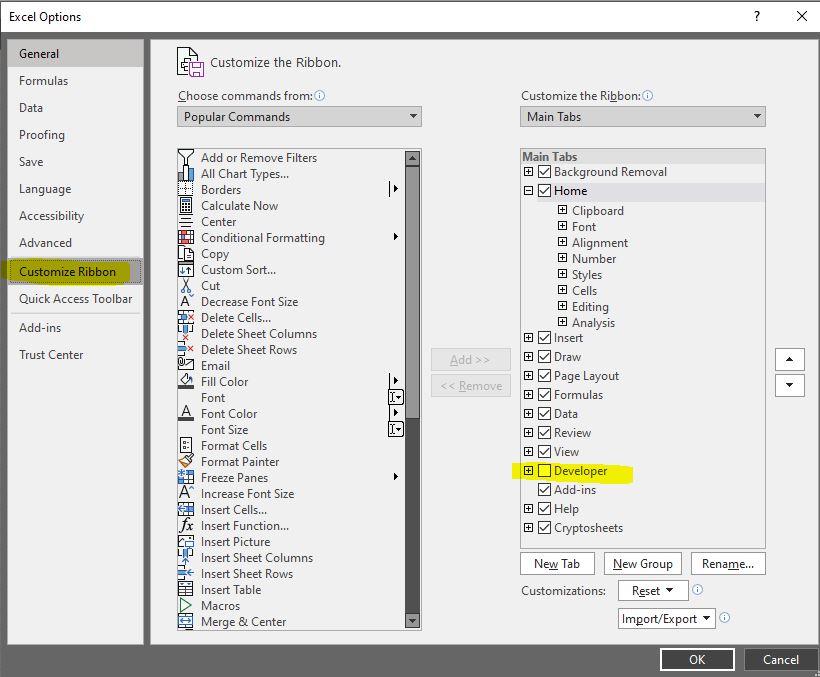
The first thing you will need for this is to enable the developer mode in Excel. First, open a new Excel workbook, go to File and click on options. Look for the Customize Ribbon menu and on the right side, tick the Developer checkbox.
After clicking on OK, you will see the new Developer tab in your Ribbon at the top menu.
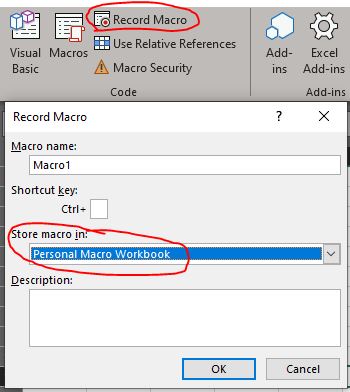
The next step is to enable your Personal Macro Workbook. To do this, click on the Developer tab that you recently added to the Ribbon and click on Record Macro. A new window will pop up and, on the drop-down menu under “Store macro in:” you will select Personal Macro Workbook.
After clicking Ok, you will want to press a couple of cells here and there to record those actions. After that, go to the Developer tab again and click Stop Recording.
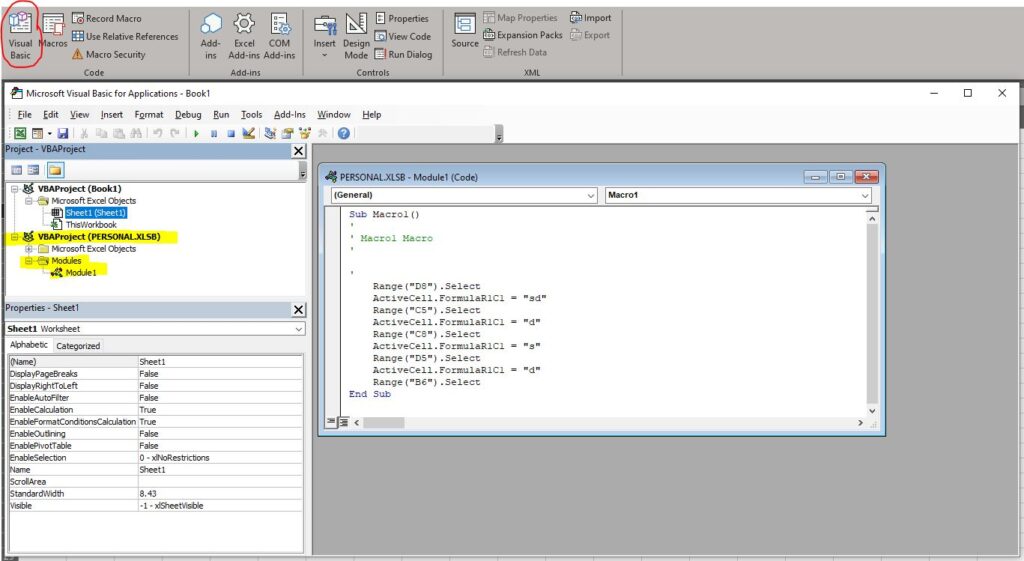
To check if this worked, click on the Visual Basic (VBA) icon, a new window will open. At the top left corner of that window, look for the VBAProject (PERSONAL.XLSB), and under Modules, you will find your recently recorded macro (double click to check the code). You can right-click on it and select Remove Module1 since it doesn’t do anything practical (you don’t want to export it, click no when you receive the message).
The rest is simple; at the top-left corner, click the save icon and close the VBA window. Save the Excel file (you can delete it afterward) and close the application. Next time you open an Excel file, the Personal Macro Book will show on the VBA screen.
For a more detailed explanation, you can follow this link.
Adding macros to the personal macro workbook
Once the personal macro book is enabled, adding some customized tools is very simple. Assuming that you already have your VBA code done and working, you can either copy and paste them directly or import the macro file (if you have one).
Adding the macro
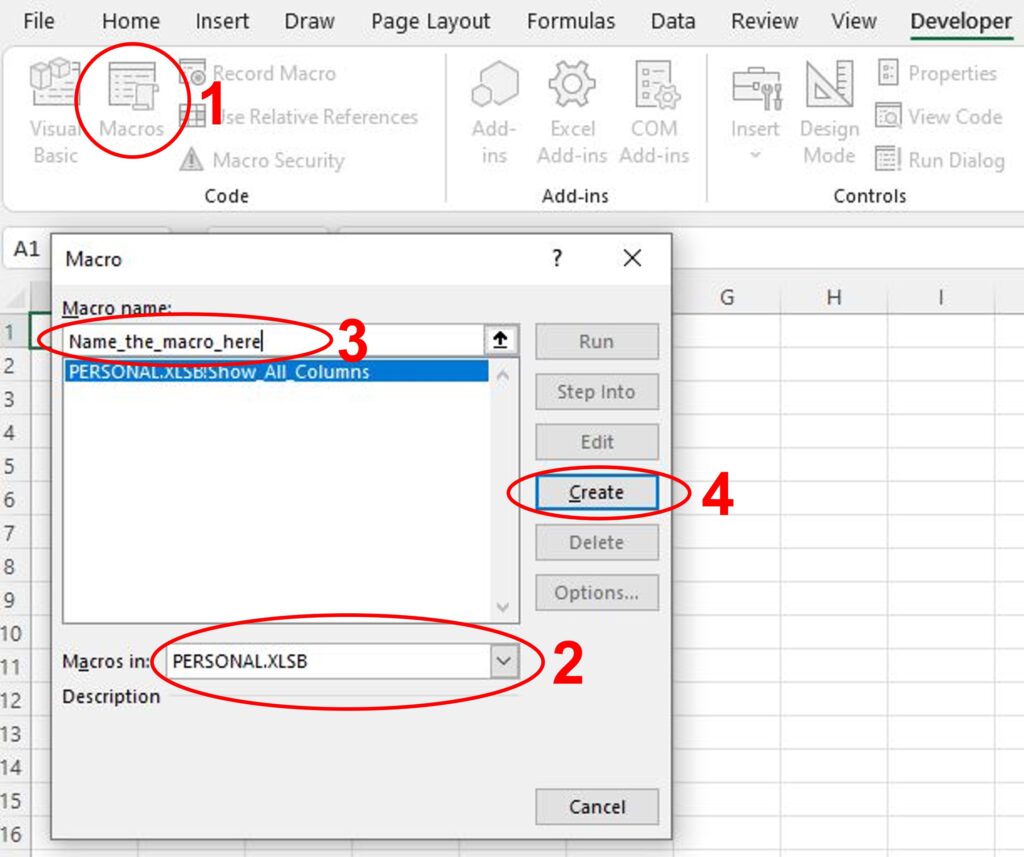
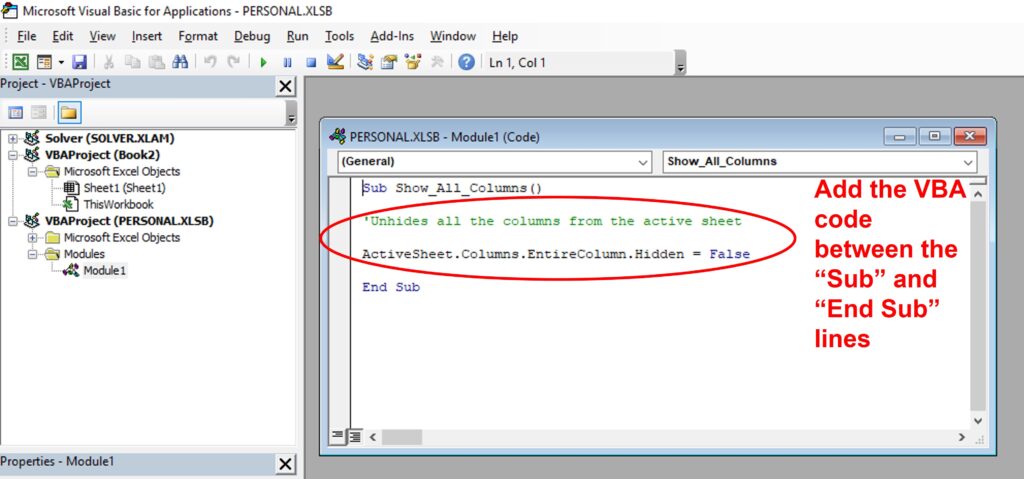
After creating the macro, on the left menu tree, look for “BBAProject (PERSONAL.XLSB)”; Under modules, you will find the new macro. Depending on the number of macros that you have, they will go from “Module 1”, “Module 2”, “Module 3”, etc. After opening one, the assigned name will be visible at the top right corner.
After creating the macro, on the left menu tree, look for “BBAProject (PERSONAL.XLSB)”; Under modules, you will find the new macro. Depending on the number of macros that you have, they will go from “Module 1”, “Module 2”, “Module 3”, etc. After opening one, the assigned name will be visible at the top right corner.
To finalize the addition of a new macro, insert the VBA code in the Module window between the “Sub” and “End Sub” lines. Next, save the macro using the save button at the top left corner menu and close the Visual Basic window.
Run macros through the Ribbon.
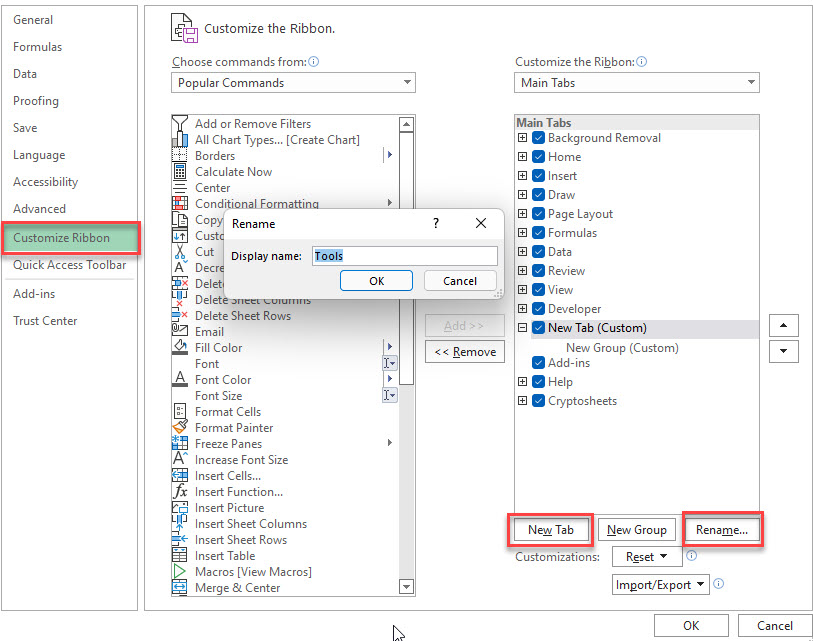
If you have some macros saved in the Personal Macro Book, the typical way to run them would be by going into the Developer tab, clicking on macros, selecting one from the list, and click Run. However, this approach takes multiple steps and does not look very elegant. The alternative is to create a new tab on the Ribbon and add specific buttons for each macro, making it fast and easy to run the tools.
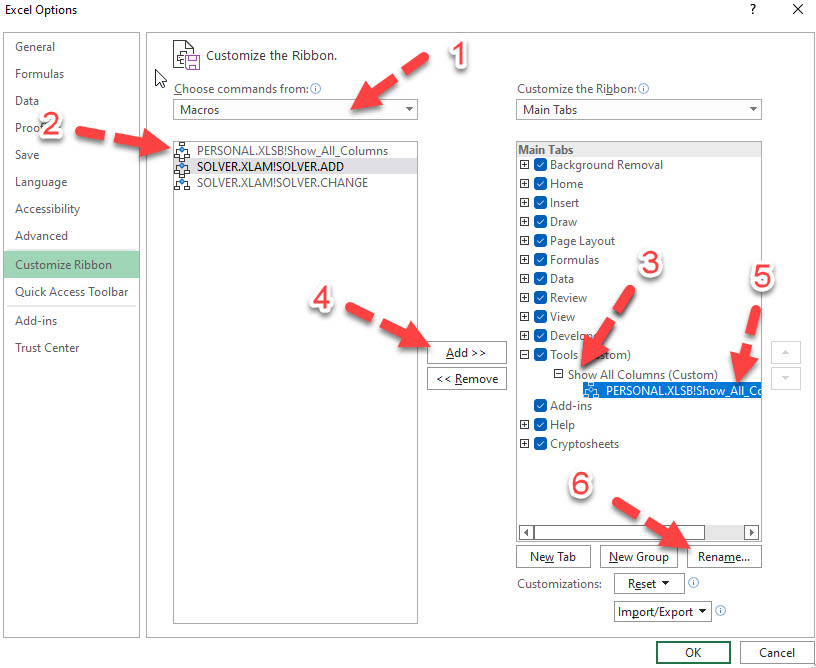
To finalize, use the drop-down menu on the “Choose from commands from:” menu and select “Macros.” Underneath the macro/s you have added, select the macro, choose the location you want to add (the new section for this example), and click on Add.
Once the macro is there, you can click on Rename to give it a “better” or shorter name, and additionally, you can select an icon from the list to identify it more effortlessly.
After renaming the macro and adding an icon, select OK in all the menus and go to the Ribbon. You will find the brand new section with the macro, now you only have to click on the icon, and the macro will run! Do this for as many macros as you want.

Custom Excel Tools
As mentioned at the beginning, in this section, I will share the macros that I use the most on my day-to-day work and briefly explain what they do. They are pretty simple but make my life so much easier. I hope you enjoy them!
Unhide all Columns
This macro will show all the hidden columns existing on the active worksheet. It is excellent when opening new files that are extensive, and you want to make sure that you are not missing any piece of information.
Sub Show_All_Columns()
‘Unhides all the columns from the active sheet
ActiveSheet.Columns.EntireColumn.Hidden = False
End Sub
Unhide All Rows
This macro will show all the hidden rows existing on the active worksheet. It is excellent when opening new files that are extensive, and you want to make sure that you are not missing any piece of information.
Sub Show_All_Rows()
‘Unhides all the rows from the active sheet
ActiveSheet.Rows.EntireRow.Hidden = False
End Sub
Show All Worksheets
Sometimes an Excel file contains multiple worksheets (tabs), and the traditional way to unhide all of them one by one is heavy clicking and relatively slow. This macro will unhide all worksheets existing in the workbook with one click.
Sub Unhide_All_Woksheets()
‘Unhide all the Worksheets in the workbook
Dim ws As Worksheet
For Each ws In ActiveWorkbook.Worksheets
ws.Visible = xlSheetVisible
Next ws
End Sub
Copy to a New File (Without Format)
There are many times when I need to copy an extensive array of data that is heavily formatted or containing formulas into another workbook. This macro will allow selecting a wide range of data and will copy into a new workbook without the need for all the steps in between.
Sub CopyToNewFile()
‘ Makes a copy of the selected cells and copies them as values in a new workbook
Dim myRange As Range
Set myRange = Application.Selection
myRange.Select
Selection.Copy
Workbooks.Add
Selection.PasteSpecial
Paste:=xlPasteValues, Operation:=xlNone, SkipBlanks _
:=False, Transpose:=False
End Sub
Copy to a New File (With Format)
Same as the previous macro, but this one will copy all the data as values while keeping the format (color, font, size, etc.)
Sub CopyToNewFileFormat()
‘ Makes a copy of the selected cells and copies them as values in a new workbook
Dim myRange As Range
Set myRange = Application.Selection
myRange.Select
Selection.Copy
Workbooks.Add
Selection.PasteSpecial
Paste:=xlPasteAllUsingSourceTheme, Operation:=xlNone _
, SkipBlanks:=False, Transpose:=False
Selection.PasteSpecial Paste:=xlPasteValues, Operation:=xlNone, SkipBlanks _
:=False, Transpose:=False
End Sub
Change Values from a Pivot Table into Sum
When creating a large pivot table, one of the most frustrating things is that the values default to Count instead of Sum. If you have multiple values on your Pivot table, this task becomes slow and with many clicks. This macro will change all those fields to Sum.
Sub PivotFieldsToSum()
‘ Will check all pivot tables and will change them to sum
Dim pt As PivotTable
Dim pf As PivotField
Dim ws As Worksheet
Set ws = ActiveSheet
Set pt = ws.PivotTables(1)
Application.ScreenUpdating = False
pt.ManualUpdate = True
For Each pf In pt.DataFields
pf.Function = xlSum
Next pf
pt.ManualUpdate = False
Application.ScreenUpdating = True
Set pf = Nothing
Set pt = Nothing
Set ws = Nothing
End Sub
Change Values from a Pivot Table into Average
Same as the previous macro, but this one will change all the fields to Average. This one is not used too often but is nice to have.
Sub PivotFieldsToAverage()
‘ Will check all pivot tables and will change them to avg
Dim pt As PivotTable
Dim pf As PivotField
Dim ws As Worksheet
Set ws = ActiveSheet
Set pt = ws.PivotTables(1)
Application.ScreenUpdating = False
pt.ManualUpdate = True
For Each pf In pt.DataFields
pf.Function = xlAverage
Next pf
pt.ManualUpdate = False
Application.ScreenUpdating = True
Set pf = Nothing
Set pt = Nothing
Set ws = Nothing
End Sub

